Showing posts with label Bridesmaids. Show all posts

Wednesday, August 21, 2013

How I Asked My Bridesmaids

As I said before in a few posts I feel a little guilty that my wedding will be in Arizona because pretty much our entire guest list has to travel. That's right, we are having a destination wedding in...Arizona. Ha! 

That being said, I wanted to ask my girls in such a special way that they feel loved that they don't care (as much) about how much money they are about to commit to spending. And luckily my wedding is taking place after Pinterest came about, so I have a wealth of ideas at my fingertips (with beautiful photos to boot)! 

I knew I wanted to send each girl an individualised package, but I wasn't sure how I was going to ask them. Then I came across these cute poems and decided to borrow bits and recruited a very talented friend to help me personalise it to my wedding. This is what we came up with:


The day, the dress,
The couple, the guests,
the smiles, the vows
And everything that wows

Expressing true love to my husband-to-be
with family and friends all watching me

Hope the sun will be shining down
and that I will fit into my gown!

Now I know it’s a big ask
For you to hop on a plane
But if you weren’t there
The day would really be lame

For you to be here on this special day
It would truly make my heart sway
And who knows which one of you will catch the bouquet

I had seen a lot of prints on Etsy connecting 2 states with hearts to represent where each person lived. I thought that was super cute, so I decided to use that for the front of the card.  I drew in the dotted line to connect the 2 locales and it turned out looking like this:


So then on the back of the card I put the poem.  But I thought it looked a little boring so I decided to fade a photo in the background (tutorial here).  It ended up looking really cool.


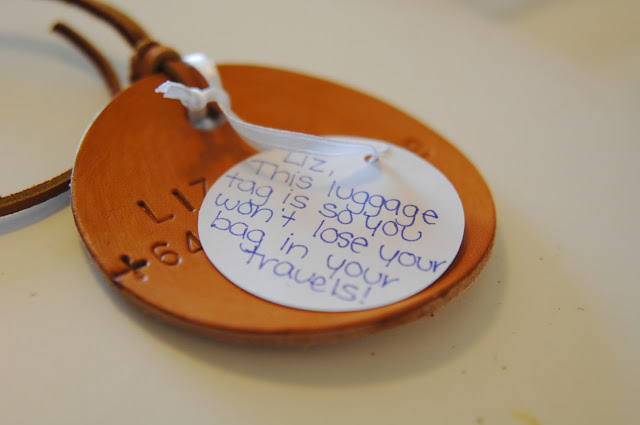
Originally Andrew and I wanted to get married in Hawaii. Unfortunately, my grandparents didn't want to make the trek there which put a kabosh on our plans. But through that process I became obsessed with creating luggage tags as our save the dates. Obviously we didn't have the money for that, but I couldn't put it out of my mind. Luckily that idea popped back up when I was thinking about how to ask my bridesmaids. Since all the girls have to travel (some farther than others) I figured a luggage tag would be an awesome gift.


You can check out the luggage tag tutorial here

To top off the whole thing I threw in some chocolate Kisses to sweeten the deal!


Since the packages I got were just a tad too small for the card (just my luck, right?) I decided to wrap it in scroll form with some pretty glittery ribbon.


This is how it came out!  What do you think?


And off in the mail they went!


Wednesday, August 14, 2013

Tutorial: How to Create a Transparent Photo in Word

I originally saw this on Pinterest, but when I went back to give credit I couldn't find the original post.  If I do find it, I will certainly link.

As part of my bridesmaid package, I decided to create something special and unique for each girl.  At some point I saw a tutorial on Pinterest for making a photo transparent in Microsoft Word.  I thought that was an absolutely brilliant way to specialize each card to the girl!

This is how I did it.

Step 1:
Open up your document in Word.  Here I have already created the front and back of my 'Will You Be My Bridesmaid?' card.


Step 2:
Now you want to insert your photo into the word document.


Step 3:
When you insert your photo it will likely push your writing (if you have any) onto another page.


Step 4:
While your photo is selected, you want to change how the photo interacts with the text.  You need to be under the 'Format Picture' tab (highlighted in purple on the top) and then select the 'Wrap Text' box (which is the one with the dog and lines behind it).  Select 'Behind Text' - this will bring your text on top of your photo.


Step 5:
Now you can make your photo transparent.  To the left of the 'Wrap Text' box is the Transparency scale.  As you drag the triangle to the right or left your photo will become more or less transparent.  Play around with it until you find the transparency you want.


Step 6:
Voila, you are done!


DIY Leather Luggage Tags


As part of my bridesmaid package I decided to send my girls luggage tags.  Frankly, I'm asking each of them to spend quite a lot of money, especially on flights, so I figured I should give them something nice.  I browsed Etsy for luggage tags, and although there were some beautiful ones, it just wasn't in my budget, so DIY it was.

I chose leather because I think it's a nicer material for a luggage tag.  It's sturdy and it looks classy on any bag.

I live in a small town, and yet we have 3 craft stores around!  I went to all 3 in order to get the leather I was looking for!  Finally at the last store, Hobby Lobby, I found the perfect leather.  I do have to say Andrew and I were completely overwhelmed when we walked into Hobby Lobby.  The store is basically the size of your average Target, and has just as much stuff!  Insane!  We had to ask for directions in order to find the leather aisle.

Simple round leather  / Hobby Lobby

I also had to buy a tooling kit for the leather, so I can make the impressions.  I also found that at Hobby Lobby (what an excellent store).  I just got the basic letter and number set.  This was probably the most expensive part of the whole project ($26.99, but if you use a coupon it's 40% off)!

Tooling Set / Hobby Lobby
The most frustrating thing I came across is that there are no instructions on exactly how to imprint on the leather.  But luckily there was a handy leathering book in the aisle at the store.  It's incredibly easy.

Step 1:
Wet the leather with a damp cloth (in my case I used a paper towel).

With leather everything should be done in circular motions.  Don't swipe the cloth, move it in circles around the leather.  This gives it a more even coverage.
Step 2:
Wait for your leather to return close to the natural color of the leather (the water will darken the leather).  This part doesn't take much time, as long as you didn't soak your leather.
Once the color returns line up your letter/numbers where you want them and then whack the end of the tooling instrument with a rubber mallet.


Now there's definitely a trick to getting the letters to line up in a straight line.  I did not get this at first and definitely went through a few practice pieces of leather (like 5...). In the end I actually used a post-it note!  Weird I know, but the adhesive side kept it in place and the edge created the straight line I needed to guide me.

Step 3:
Punch a hole in the top of the luggage tag.  This is so you can attach a piece of string so your tag can be  attached to your bag!
This step really tripped us up, and I, unfortunately, have no pictures to show you.  We went to Home Depot and bought a grommet kit.  The grommets didn't actually fit because the leather is actually pretty thick (1/8"), so we just used the punching part of the kit and were able to punch pretty decent holes.

Step 4 (optional):
The leather I had chosen didn't match any of the leather strings that were available, so I decided to stain the leather pieces.  I wrote a short post about staining here.  The whole process is actually really easy and takes 5 minutes.  First I had to buy some stain, and yes you guessed it, I bought it at Hobby Lobby!

Eco-Flo Leather Stain in Desert Tan / Hobby Lobby
Just as with the water you need to move the stain in circular motions.  I practiced on a spare piece of leather, but I picked it up pretty quickly.  Once you've finished let the leather dry for at least a few hours - I just left mine overnight.

Step 5:
Now that my leather was stained it matched perfectly to the light brown leather string at Hobby Lobby. String isn't really the right word because it's pretty thick, but it serves the purpose.

Leather String / Hobby Lobby (similar)
Now you just have to fasten the string through the hole.  I had no idea how to do that, so I googled and found this video which was super helpful.


This is how mine came out.


Thursday, August 8, 2013

Leather Staining

So I'm trying to not reveal too much on my blog, but every week I want to post something about my upcoming wedding!  I haven't asked my bridesmaids yet...because I'm planning something special, so I don't want to spoil the surprise!

BUT, I can share the following with you: as part of my asking the girls, I needed to stain some leather.  Please keep in mind that I haven't really been all that crafty in my previous life, so I'm learning as I go!

I drove out to the nearest Hobby Lobby (which is not an easy task as it's in the next town over and takes 20 minutes if you catch all the green lights) and bought some leather stain.  I ended up using Eco-Flo, mainly because it was the only stain with instructions on the bottle.  Seriously...the only one...

The dreaded leather stain
As you can see the bottle was $5.99, but I used my iPhone Hobby Lobby app for 40% off, so it only cost me $3.59.  Seriously a great deal because I still have the entire bottle left.  I have no idea what I'm going to use it for...but I'm sure I'll figure something out (or wind up keeping it for the next 10 years and then eventually throwing it away).

It even stained my fingers and nails!
The stain was super easy, but wound up staining my fingers too!  You just take a dry cloth and rub in the stain in a circular motion.  I had to practice on a scrap piece of leather a couple times, but you pretty much get the hang of it.

Stained cloth...probably will be throwing away!

Post staining
There you have it...all the leather stained.  I had 6 pieces and it took me less than 5 minutes from beginning to end.  The longest part is the dry time, but I just left mine on the table over night.

Now that this is done I just have to finish up the packages and get them sent off!  I'm sooo excited to have the girls open their boxes!

Wednesday, July 31, 2013

Bridesmaids

I haven't been to many weddings (like literally 3 in my whole life), but I've been told that you're supposed to ask your closest girlfriends to spend lots of money to show you that they love you!  Seriously though...being a bridesmaid is not all it's cracked up to be.  Sure, your friend chooses you out of all of her friends to be shown off in photos for years to come but it's incredible how much money you, as a bridesmaid, are asked to spend...

There's the dress (obviously), any accessories / shoes you're forced to wear in order to match 3-20 other girls.  The airfare, the lodging, the food - and that's not even the wedding yet, that's the bachelorette party and the bridal shower!  Ugh.

Vagina high slits are coming back in right? And chucks because...duh source
I am trying to be sensitive to the fact that I'm being an asshole and asking people to come out to Arizona for my wedding.  I mean...seriously, it's a destination wedding for pretty much everyone on our guest list.  Terrible.

I might just have to demand a photo like this.  It's classy, no? source
So I thought I would do a nice thing for each of my girls and show them how much they mean to me!  Since I haven't mailed them out yet I can't ruin the surprise and post everything on here...but, here's a little sneak peak for you (because my sister already knows she's the Maid of Honor)!